Showing posts with label How To. Show all posts

Monday, January 7, 2013

HOW TO: Resolutions

I honestly love New Years. It is one of my favorite holidays. It has all my favorite things- fireworks, kissing, staying up late, eating tasty appetizers, starting the year off fresh. What's not to love?

This year, under the direction of my SUPER friend Brook I was a bit more thoughtful about my resolutions. For me it has now become a 5 step process & I'm here to share it with you friends (please note: this is more touchy-feely/spiritual/conceptual than I tend to get here on the blog but go with it I promise you won't regret it):

Step 1: PUT YOUR PAST YEAR TO REST
I had, at a conscious and unconscious level, wanted to and sorta had been doing this but I didn't really know how to do it in any pragmatic way until Brook sent a link to me (here) of a work sheet you can fill out that helps you kind of look at your past year- the good stuff, the sucky stuff, disappointments, and triumphs. And, oh boy, did it help.

Then at our solstice celebration we wrote down a word from this past year that encapsulates perhaps the hard parts of the past year (that's when I picked the word SURVIVAL to describe 2012 because while I love it, the first year of a babies life if survival-mode for the mama) and then we burned the little pieces of paper in essence eliminating that hard time and having a clean slate for new times to come.

It was fantastic to put 2012 to a close. Something I have never done it in such an organized way, but I plan on doing from now on.

Step 2: PICK ONE LITTLE WORD
This is also a concept Brook taught me (I told you she's SUPER) & she did it much more justice on this post from her blog (go read it now). But I'll tell you in my lack luster words- it's the idea of picking ONE WORD to encapsulate your goals for this year. Maybe the word just comes to you, but for me, I looked at the goals I had for this year, the things I wanted to get done, changes that needed to be made, meditated on it, prayed about it, & then came to my word. Which, my friends is REVOLUTION. There are a lot of things that need to be revolutionized in my life. A complete upheaval in some parts, but there are quiet revolutions need to happen everyday also.
This is also something we celebrated at our Winter Solstice party too. Other words that people picked were: Light, Whisper, & Today. So, what I'm saying is you can pick ANYTHING. If you decide on one & wouldn't mind sharing post here- I'd love to hear it.

Step 3: PICK A PHRASE
In my case I picked a scripture that happens to completely encompass the things that I want to work on this year (seriously you guys, I take the fact that I found this, as a sign that I'm focusing on the right things, right now). It is "Establish a house. Even a house of prayer, a house of fasting, a house of faith, a house of learning, a house of glory, a house of order, a house of God." Now your phrase can be anything- long, short whatever but, for me, already, 7 days into the New Year, it's become a mantra.


Step 4: MAKE AN INSPIRATION BOARD*
I've had an inspiration board above my computer for a long time. When I was a teenager it was more like an inspiration wall (like complicated, angsty wallpaper). But I love the idea of doing something a little smaller this time (mine is a 16x23 inch pin board) that focuses solely on what I want to accomplish/how I want to feel during this LUCKY 2013.

I'm sure we've all done this before, so you all don't need instructions but take a look here at my friend Meagan's board (her's is huge & blocked into sections) and here's Brooks board (her's is on 12x12 scrapbook pages & covered with lovely pictures from magazines). They can be as full as you want, sectioned off, colorful- whatever you need. For me, I needed it to be clear, focused, straight lined because, as you all know I'm not that way AT ALL.

* NOTE: I actually have a Pinterest board too & I love having both. Mostly because I need my physical board to be REALLY clean and clear & I like being able to add to my Pinterest board as I go along. I have things on my Pinterest board that are more practical too. Things like: dying my hair a funky color, seeing the Red Woods, camping, having adult dinner parties, taking a great family picture- things like that. You can check mine out here.


Step 5: GET YOUR BUTT IN GEAR!
'Nough Said.

There we go. I guess the point I want to make here also is that you don't need a New Year to do this (though it's an excellent starting point) but you can do this any time in any way that works for you. I'm sure there will be be updates here on the blog & I want to hear about your New Years Resoltuions.

Do you love New Years? 
Do you have traditions when it comes to your resolutions? 
What are some of the things you want to accomplish in the nest year? 
Has anyone picked their word/phrase yet?

Saturday, September 22, 2012

HOW TO: Not Find Out the Gender of Your Baby

Congratulations you've decided to not find out the gender of your baby!

Now, I have two secrets for you:

A. It's going to be totally awesome. 
AND
B. People will hate you. Openly. 

That being said, I will now dispense of my TOP 10 LIST HOW TO NOT FIND OUT WHAT YOU'RE HAVING

1. Be prepared to get flack. (I make this #1 because I was wholly unprepared for it.) When I would tell people that we decided not to find out, it was as if any decision about my reproduction was up for discussion. I actually had a friend say it was "selfish" to not find out what we were having & I had a lot of "that's SO annoying". Also be prepared for a fair bit of defensiveness from people who did find out what they are having. Neither decision is right or wrong. It just is. But it's apparently a more passionate issue for people than I had thought.

2. Make the decision &stick to it. If you change your mind, that's totally awesome. Don't let people make you feel lame if you change your mind. But like I said, you will likely get some flack so decide & stick by it through the dissension that may come.

3. Remind the ultrasound tech that you don't want to know. This is obvious but also tell them to have you turn away when they gets close to the "baby bits" area. Scott spotted the gender on both babies the second our tech got even near. Most people have their one 20 week ultrasound & if that is you than you're probably fine. I had to have 2-3 ultrasounds a week for the last couple months of my pregnancy & every time I was TERRIFIED they'd look & then let it slip.
4. Be prepared to be unprepared. Let's be honest, there are some cute gender neutral clothes, but there aren't tons out there. So, get a couple get-through-the-first-couple-weeks clothes (white onesies, grey stripes, yellow booties, etc) & then go shopping when you're up for it. We also didn't prepare a nursery until after Linc was born (or you know, still haven't 7 months later!).

5.  Be ready for a boy or a girl. I didn't buy many clothes (I had some boy & some girl clothes left over from Syd & Rob) but to bring my baby home I had a cute all white sleepy and one blue hat & one pink hat so I'd be ready for either one. We also had a list with 2-3 boy & girl names. Cover all your bases for both genders.

6.  Get ready for the nay-sayers to come around. Once it was time for me to actually be in labor everyone was ecstatic, dying to find out what the baby was. The people who were "anti" came through excited in the end. Most people said the anticipation of finding out what it was was really fun for them too. Even the nurses where excited. One nurse was SO upset that she was off shift & I hadn't given birth yet so she wouldn't be there to find out what I was having.

7.  Actually finding out is unforgettable. It was intense & exciting, like every birth is, but having Scott grab & hold the baby to announce to the whole room that we had a boy was just so much anticipation, tinged with exhaustion, tied up with finally knowing. It was a veritable concoction of awesomeness that I'll never forget.
  
8. You might have a hard time wrapping your mind around your babies gender. I called Lincoln "BABY" &"IT" for months after giving birth. I was so used to not knowing what I was having it took a while to wrap my mind around the concept that he was a "he". When Scott announced it was a boy I kept saying, "A boy? A boy? A boy?" Like a crazy person. Because, frankly, I'd just given birth so I was a crazy person.

9. Lastly, have fun with it. Take a poll. Take bets. Have a gender neutral baby shower. Have your other kiddos, if you have any, draw pictures/guess about what the baby might be. Embrace it! Rock it!

10. If we have another one I'd do it 100% again.

AND GOOD LUCK!

Has anyone else not found out? 
Any advice for people thinking about it?
And if you're a nay-sayer it's cool, you can leave your opinion too.
Livie's not a hater either way.

Monday, August 6, 2012

HOW TO: Prepare & Eat an Artichoke


There are lots of things that attracted me to Scott when we were dating (I mean, just look at the handsome fellow) but his love of food is one of them.

Today we had artichokes for an after dinner treat. And, yum oh yum! You heard it folks, WHOLE artichokes is a Carter favorite. Scott grew up dipping his in straight mayo. It's not terrible or anything but it doesn't compare to my families tradition of dipping our artichokes in butter with a little dill (here are a couple other tasty options for dipping sauces that I will be trying next time here & here).

But first & foremost, friends, you have to learn how to prepare & eat whole artichokes. Here I am to save the day!

HOW TO PREPARE:
1. Cut off about an inch of the end and cut off the top of some of the more spikey tips (usually I don't do this & haven't noticed any difference. I guess it depends on how spikey the tips are).

2. Put them in a big saucepan in a couple inches of water (basically for steaming) Cover with a lid & boil for 30 min. It doesn't matter if they are stem down or up or on their side (I'm pretty sure I always just throw mine in so they lay on their sides).

3. Pull them out and let the water drain out of them for a bit. Then serve.

HOW TO EAT:
1. To eat you pull off one of the outermost petals. Dip the base of the petal into your favorite sauce.
2. Pull the petal through your slightly clenched teeth to remove the soft, tender, & tasty flesh at the bottom of the petal. Discard remainder.
3. Keep going around the artichoke eating until all petals have been removed (the ones in the very middle are lame & have no "meat" on them so just pull them off & toss). Then you will run into the fuzzy choke guarding the heart.

4. You remove it by scooping out the fuzziess it out with a spoon.

5. Now eat the heart- the best part & worth all the work- just dip, bite, & enjoy!

It's an awesome food to have when you're slowly eating & chatting. Or as a snack. Or as something different or pretty to serve for a dinner party. Or to eating while watching a movie.

Or, you know, basically anytime. Anywhere.


P.S. Any other artichoke eaters out there? Any other advice for first time tasters?

Wednesday, July 4, 2012

HOW TO: Gallery Opening Party


I had an absolute blast with my 30th Golden Gallery Opening Birthday Party I just had to share the how to for it.

I started off buying bunches of 6X6 canvases. You can get them at any craft store or even at WalMart. You can do any size or type of you want, but 6X6 was small enough to not take up too much space & big enough to have space to work on.

Then I mailed out/handed out the canvases to some important people in my life with the instructions to paint, paste, marker, glue, write, tape, or really ANYTHING on it. It was supposed to be representative of me/them/our relationship or just something they would think I'd like.

Some people loved the idea, while others were pretty hesitant but in the end even the people who weren't really excited about it loved the opportunity to stretch a little creatively. How often do you get to bust out a piece of art?

For the display table at the party I bought a bunch of mini easels (also at a craft store for about $1.50 each) & spray painted them gold.
I emailed out to everyone to have them send me the title of their piece so I could make little name plates for the display table. The plaques didn't end up as fancy as I would have liked, but you can make it as easy or detailed as you want.

I had the table set up so as the guests arrived they could set them on their spots. It was so much fun seeing what each person did. Every single one really "felt" like the person who created them & were perfect for me.

After the party the canvases are going to hang in my office so I can remember those important people in my life & my awesome 30th birthday bash!

Tuesday, July 3, 2012

HOW TO: Easy Mini Parfait


So, this appears to be a continuing theme in my life; how to make something fancy but easy. And desserts are a favorite (see my other fancy-looking-but-really-easy-desserts here & here).

While wandering through the partystore just before my birthday I ran into these adorable mini tasting spoons& immediately thought, "What can I make that will give me an excuse to buy these tiny spoons?" Then I spotted plastic shot glasses out of the corner of my eye &, behold, the idea for Mini S'more Parfait was born.

1. Assemble ingredients: graham crackers, chocolate pudding, marshmallow cream, & marshmallows to top it off. I made this as EASY as possible so I didn't even bother with having to stir instant pudding- I went for pudding cups. For reals, people, I don't mess around when it comes to ease. Don't forget the shot glasses & spoons.

2. Crush up the graham crackers.

3. Layer the chocolate pudding, the marshmallow cream, & the graham cracker crumbles.

4. Top off with graham cracker crumbles.

5. Add marshmallows on top- I tried a big marshmallow, and medium sized marshmallows. They didn't look nearly as good as mini marshmallows& the SUPER mini marshmallows (I got mine from a package of hot chocolate, but thesecould work.).

6. Show off the impressive goodness!


P.S. They also travel really well. I took mine to an evening picnic at the pool & tossed them into a tupperware container & they fit like they were made for it!

Tuesday, June 26, 2012

HOW TO: Easy Flower Crowns & Easy Customizable Fans


It's so easy you brilliant people don't need a tutorial but someone asked me how I did the crowns & fans for our Summer Solstice Celebration. Plus, I want to show, like many things on my blog, how you can make fancy "seeming" recipes/DIY activities/ crafts that aren't fancy at all. 'Cause that's the way I roll.

FLOWER CROWNS:

I bought flower wire from the craft section at Jo-Anns. I kinda wish it was thicker & if you have the option of thicker wire (but still super bendy) do it. I got all the flowers at our local Dollar Tree (because the same flowers are like $6 a pop at Jo-Anns). And hot glue (my best-crafting-friend).

I took the wire, measured it around my head, twisted it & then twisted a second time all the way around to give it some thickness (again, it was REALLY thin wire- so easy to work with but thin).

Then I took apart the flowers & leaves from the stems. You could easily make a crown with just flowers & no leaves but I loved the way it looked with flowers & leaves (and much more summery).

Then just kind of glob the glue on there and stick in on (I started in the center & worked my way around each side). It's gonna look like a hot mess when you start but once it's all on there I promise it looks great.

Put on the glue & held it for a second, blowing on it. Then I set it down to dry (on a cardboard box in case it sticks) & then added the flowers along the edges.

I went for a more random sort of look but it could be great with one kind of flower, super symmetrical, & I even made a cute all leaf one fore Rob. I also made one on a headband for Syd which was cute but sits up higher on your head- more a Frida Kahol look.

Wear it proudly & feel super pretty (or handsome as the case may be).


FANS:

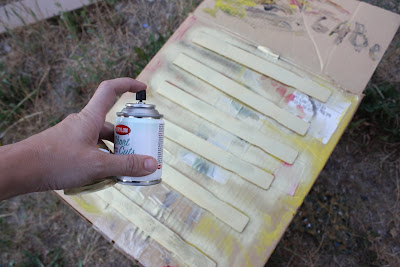
I have a collection of paint stirring sticksfrom various home projects & they were perfect for the handles of the fans. I bought a mini can of gold spray paint & painted them (it took less than a minute & it drys SO fast).

Since we were doing an evening party I opted for a "summer night sky map" & then prettied it up (in "Paint" mind you, no fancy "Photoshop" here) with gray & yellow.

Then I found a quote (Thank you, Pinterest) about stars on the other side. It turns out this quote isn't from Galileo but rather from this lovely poem "The Old Astronomer" by Sarah Williams.

I printed them off on heavy paper & hot glued them to the stick and then hot glued them closed. Then I just rounded off the corners.

Ta-da! They could be customized for any kind of party- for a wedding with ceremony info on it, for an auction (as the paddles), with your babies face on it for a b-day party. The ideas are endless & I will SO be using this idea again.

Email or leave a comment if you have any questions!

P. S. After I painted the sticks I walked all around the house trying to find stuff to paint. I ended up with just a couple mason jars (which I am SO in love with). But watch out or everything in your house may end up spray painted gold.